Sunday, September 30, 2007

Principles Of Hydroponics Gardening

Crops are grown in beds which are really shallow tanks or troughs that serve as a container for gravel or coarse sand. If there are several of these beds, they should be set up in a series at the same level and of a similar size.
These beds should be about 3 feet wide and any convenient length, although 100 feet is common. The sides are about 8 inches high and with a V bottom so the center is 11 or 12 inches deep at the center.
Beds intended to survive massive earthquake damage should be wooden frames lined with heavy vinyl sheeting. Pipes or other fittings should be plastic for increased flexibility and ease of repair.


This permits an arrangement whereby a half-tile or similar device through the center of the bed will feed or drain the solution rapidly from one end of the bed to the other. It is very important that the slope be precise, with no low areas from which solution will not drain.
Drainage in the beds is not only pointed toward the V bottom of the bed, but also toward one end of the bed, so that the V at the drain end is 2" lower than at the high end of the bed. This is a slight slope in the bottom of the trough.


There must be a pipe connection to the lowest point in the V at the drain end of the trough. The nutrient solution can then be pumped into the trough through that pipe and will drain out again when the pump has been shut off. The quantity of solution in the tank should be just sufficient to bring the water level up to within 1/2 to 1 inch of the top of the gravel or sand in the beds.
The entire hydroponics system is relatively simple to operate and may be made at least semi-automatic. In cool weather, pumping solution should be done once a day, but in warm, dry, or windy weather, it may be necessary 2 or 3 times a day. Installation of a time clock allows the start and stop of the pump to be automatically.
A centrifugal pump of sufficient capacity to fill beds in one-half hour is generally best for forcing the solution into the beds. With a centrifugal pump, the solution will flow by gravity through the pump back into the tank.


For those without a pump, a simple pail and flexible hose system to give the hydroponics beds their daily nutrient bath works well.
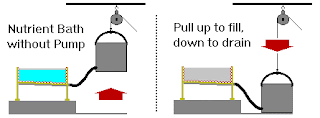

Gravel for the bed should be fairly uniform in texture, about 1/2 to 1/4 in diameter, and washed. If you use sand, it should be coarse and it also should be washed. Beds should be filled to within 1 inch of the top. The mix should be sterilized with heat or steam to prevent mildew and fungus problems.
Use the best seed for seedlings, planted in disease-free soil or sand and six inches or more high before transplanting. Loosen the planting media around the roots so that there will be as little injury as possible to the roots during transplanting. Rinse the planting media off the roots with water before planting in the hydroponics beds.
Supporting structures may be necessary to hold up the plants, as plants loaded with fruit, for example, are heavy. Do not attach supports to the ends of beds because the weight of the plants may warp the structure and cause leaks or draining problems. All supporting wires are suspended from overhead supports that are spaced at intervals alongside the troughs.

Cooling of the hydroponics area can be achieved by ventilation, as transpiration of moisture off the leave cools the plants just as perspiration cools the human body. Slats or windows that allow the air to circulate should be included in the arrangement.
Plants produce oxygen during the day, under lighted conditions, and carbon dioxide during the night. Hydroponics areas attached to living areas thus can oxygenate and cleanse the air of carbon dioxide, but should be closed off during the night so that oxygen is not depleted from the sleeping areas.
Pollination can be done either by bees or by hand, by manually shaking or tapping the flowers once a day, going flower to flower so as to spread the pollen. Pollination helps increase fruit yield, and for some produce makes the difference between a high yield or no yield at all.

New Research

Ongoing research with plants such as tomatoes in floating systems indicate that larger plants require more above-water rooting volume (more air-space) in order to produce successful yields. To produce more root mass above the water, you may want to test a system that uses two stacked styrofoam floats with holes drilled in the bottom one and all but a six-inch edge around the perimeter cut out of the top one. Fill the empty top float with perlite, vermiculite, or other hydroponic media and plant vegetables or flowers into it the same way you would plant a normal garden. Preliminary results show this method to be promising if starter fertilizer is used on the young plants until their roots reach the fertilized hydroponic solution below the floats.

Saturday, September 22, 2007

Requirements for Plant Growth

Hydroponic systems will not compensate for poor growing conditions such as improper temperature, inadequate light, or pest problems. Hydroponically grown plants have the same general requirements for good growth as field-grown plants. The major difference is the method by which the plants are supported and the inorganic elements necessary for growth and development are supplied.

Temperature. Plants grow well only within a limited temperature range. Temperatures that are too high or too low will result in abnormal development and reduced production. Warm-season vegetables and most flowers grow best between 60° and 75° or 80° F. Cool-season vegetables such as lettuce and spinach should be grown between 50° and 70° F.

Light. All vegetable plants and many flowers require large amounts of sunlight. Hydroponically grown vegetables like those grown in a garden, need at least 8 to 10 hours of direct sunlight each day to produce wells Artificial lighting is a poor substitute for sunshine, as most indoor lights do not provide enough intensity to produce a crop. Incandescent lamps supplemented with sunshine or special plant-growth lamps can be used to grow transplants but are not adequate to grow the crop to maturity. High intensity lamps such as high-pressure sodium lamps can provide more than 1,000 foot-candles of light. The serious hobbyist can use these lamps successfully in areas where sunlight is inadequate. The fixtures and lamps, however, are very expensive and thus not feasible for a commercial operation.

Adequate spacing between plants will ensure that each plant receives sufficient light in the greenhouse. Tomato plants pruned to a single stem should be allowed 4 square feet per plant. European seedless cucumbers should be allowed 7 to 9 square feet, and seeded cucumbers need about 7 square feet. Leaf lettuce plants should be spaced 7 to 9 inches apart within the row and 9 inches between rows. Most other vegetables and flowers should be grown at the same spacing as recommended for a garden.

Greenhouse vegetables, whether grown in soil or in a hydroponic system, will not do as well during the winter as in the summer. Shorter days and cloudy weather reduce the light intensity and thus limit production. Most vegetables will do better if grown from January to June or from July to December than if they are started in the fall and grown through the midwinter months.

Water. Providing the plants with an adequate amount of water is not difficult in the water culture system, but it can be a problem with the aggregate culture method. During the hot summer months a large tomato plant may use one-half gallon of water per day. If the aggregate is not kept sufficiently moist, the plant roots will dry out and some will die. Even after the proper moisture level has been restored, the plants will recover slowly and production will be reduced.

Water quality can be a problem in hydroponic systems. Water with excessive alkalinity or salt content can result in a nutrient imbalance and poor plant growth. Softened water may contain harmful amounts of sodium. Water that tests high in total salts should not be used. Salt levels greater than 0.5 millions or 320 parts per million are likely to cause an imbalance of nutrients. The amateur chemist may be able to overcome this problem by custom mixing the nutrient solutions to compensate for the salts in the water.

Oxygen. Plants require oxygen for respiration to carry out their functions of water and nutrient uptake. In soil adequate oxygen is usually available, but plant roots growing in water will quickly exhaust the supply of dissolved oxygen and can be damaged or killed unless additional air is provided. A common method of supplying oxygen is to bubble air through the solution. It is not usually necessary to provide supplementary oxygen in aeroponic or continuous flow systems.

Mineral Nutrients. Green plants must absorb certain minerals through their roots to survive. In the garden these minerals are supplied by the soil and by the addition of fertilizers such as manure, compost, and fertilizer salts. The essential elements needed in large quantities are nitrogen, phosphorus, potassium, calcium, magnesium, and sulfur. Micronutrients - iron, manganese, boron, zinc, copper, molybdenum, and chlorine are also needed but in very small amounts.

Support. In a garden the plant roots are surrounded by soil that supports the growing plant. A hydroponically grown plant must be artificially supported, usually with string or stakes.

Introduction for Hydroponics

IN RECENT YEARS GROWING PLANTS HYDROPONICALLY--that is, with the roots in a medium other than soil--has stirred the imagination of many persons interested in plant growth and development. Commercial growers have adopted hydroponic methods to produce crops in circumstances that would otherwise be unfavorable. For the plant hobbyist, hydroponics offers an opportunity to learn more about the growth of plants and their interactions with their environment. Gardeners may grow flowers, ornamental plants, and vegetables by hydroponics. Growing your own fresh vegetables out of season can be a special winter treat.

Colorful sales campaigns and articles in the popular press have led people to believe that hydroponics is a new discovery that will revolutionize modern agriculture. However, the basic techniques have been used by plant researchers for well over a century to determine the effect of particular nutrients on plant growth and yield. The first recorded experiments were conducted in England in 1699 by Woodward. By the mid-nineteenth century, Sachs and Knop, pioneers in this field, had perfected a method of growing plants without soil. In the late 1920s and early 1930s Gericke was able to grow plants successfully on a large scale by adapting the laboratory technique of solution culture.

The widespread use of hydroponics for commercial plant production is a relatively recent occurrence. In areas where soil is lacking or unsuitable for growth, hydroponics offers an alternative production system. However, there is nothing magical about hydroponics. Equally good crops can be produced in a greenhouse in conventional soil or bench systems, often at lower cost.

Pest Control

The control of plant pests has always been a contentious issue and we would assume that the majority of serious growers would like to avoid the use of toxic chemicals wherever possible. Like every other aspect of plant rising, there have been many changes in recent years. These have been tested and fines tuned by professional growers and are now becoming available to the amateur gardener. Amongst the new technologies, the idea of biological pest control must take pride of place. Like all great concepts, it is simple yet effective and is causing major changes to the way we do things. Biological pest control is one of the most exciting developments in modern horticulture and it offers a vision of a pesticide free future when man can use nature’s own weapons to grow his food in an uncontaminated atmosphere and a cleaner, greener world. Basically, biological pest control involves the introduction of friendly creatures to combat the ones that do the damage. These creatures are known as predators because they feed on the pest at some stage in its life cycle.

Two-spotted Mite (Spider Mites)

These little creatures, almost invisible to the naked eye, are undoubtedly the greatest menace to the grower. They are often unseen and unsuspected until their numbers are high and they can multiply at a devastating rate. If they find favourable conditions in the greenhouse or indoor growroom they can literally destroy a crop.

The first signs of their presence are small dead spots that appear in clusters on the affected leaves. This is followed by a general bronzing of the foliage and as the infestation increases, there will be visible deposits of fine webbing on the underside of leaves. Old fashioned methods of chemical control have never been successful for long as these creatures are very adept at developing resistance to each poison in turn. Man has responded by using ever more toxic chemicals to control them with an ever decreasing success rate. The side effects of this are the collateral destruction of hundreds of beneficial or neutral insects that would normally co-exist with the mites in some sort of balance.

The solution that biological pest control offers is the introduction of another mite called Phytoseiulus Persimilis which lives exclusively on two-spotted mites. If the population of pests is at a high level, the predator will multiply in relation to its food supply. Once the pest is reduced then the predator will begin to die out as well. A balance should then be achieved which will maintain the pest population at low levels, below the point at which they will cause visible damage. If the pests do begin to multiply beyond the predators’ capacity to consume them, the grower can then make small adjustments to the environmental conditions (temperature and humidity) that will favour the predators over the pests. Predator mites are known commercially as SPIDEX and can be purchased at Esoteric Hydroponics.

Humidity

Humidity is another important consideration in grow room management. If it is allowed to get too high for prolonged periods, it will cause problems both in your room and amongst your plants. The main danger is the development of Botrytis or grey mould amongst the flowers or fruit. This organism thrives in conditions of high humidity and will quickly spread and ruin a crop. Plants of the melon family and strawberries are particularly susceptible to fungal diseases and should be provided with a dry environment. The cautious grower will always monitor the humidity in his grow room which is measured by another simple device called a hygrometer. This is a dial type instrument that can be mounted on the wall next to the Max-Min thermometer and give a constant and accurate reading of humidity. The ideal humidity for normal plant rising would not be much above 50%. If it rises above this, the grower will normally operate his extractor fan until it has been reduced. To keep this potential problem under check, it is advisable to avoid leaving water on the floor which can then evaporate and raise humidity. Any water or nutrient solution that spills or overflows should be wiped up promptly and nutrient tanks should be covered at all times. Any water that is left exposed to the heat from your grow lights will rapidly evaporate and add to the humidity levels. Keep your greenhouse or grow room dry.

The Pest: Whitefly


First Signs: Tiny, pure white "moths" resting on leaf surfaces. When the leaves of the plant are disturbed, these moth-like white flies quickly flutter up, then settle back down onto plants.
Leaves may appear shiny with honeydew. A magnifier reveals clear-white "scales" (the pupae) on the undersides of leaves. All life stages of the Whitefly literally suck the water out of plant leaves.
Most Common Species:
Greenhouse Whitefly & Sweet Potato Whitefly. It's so difficult to be certain which species you have that we advise either consulting your county agent to be sure, or simply widening your predator strategy to cover both species - it's not uncommon to have both pests together.

Common Problems

Note: Always check the pH and adjust if necessary to 5.8 - 6.3. Check and maintain an optimum nutrient level.

NITROGEN (N)
Save the Plant : Add fertilizer containing N. It may take up to a week for this treatment to work.


PHOSPHORUS (P)
Save the Plant: Add fertilizer containing Phosphorus. New growth will appear to be normal but already affected leaves will not recover.


POTASSIUM (K)
Save the Plant: Add fertilizer containing K.


BORON (B)
Save the Plant: Use a teaspoon of Boric acid per gallon of water.

CALCIUM (Ca)
Save the Plant: Foliar feed the plants with one tsp. of dolomite lime or one tsp. of kelp per quart of water until condition improves.


IRON (Fe)
Save the Plant: Foliar feed with a fertilizer containing Fe. (#6 of our Six Pack)


MAGNESIUM (Mg)
Save the Plant: Foliar feed with a liquid fertilizers containing Mg. Increase pH.


MANGANESE (Mn)
Save the Plant: Foliar feed with any fertilizer containing Manganese.


MOLYBDENUM (Mb)
Save the Plant: Foliar feed with a fertilizer containing Mb.


SULPHUR (S)
Save the Plant: Mix one tablespoon of Epsom salts (#5 of our Six Pack) per gallon of water until the condition improves.


ZINC (Zn)
Save the Plant: Apply a fertilizer containing Zn.

Hydroponic Science Projects - An Introduction

Please do note that hydroponics works really well because the gardener provides everything the plants need. So by cutting down to the very basic needs for a hydroponic system we actually give the plants a disadvantage.

Requirements

When doing a science project on hydroponics, these are the very basic things you need:

> A garden system
> growing medium
> A & B nutrient
> pH kit
> Seeds
> A bucket
> Piece of water hose, attached to the bucket and to your tray


With hydroponics the gardener usually also provides the light. If you have a grow light, use it. If you don’t make sure the plants get ample sunlight.

A standard 2 part nursery tray and a bucket can be easily rigged to a 'flood & drain' garden.

A hydroponics growing medium is completely inert. An inert medium will not effect the pH of the nutrient solution. It does not provide anything but an anchor for the plant. Hydroponic growing mediums are less compact than earth so the roots get more air.

The growing medium we suggest for a project is ‘Rockwool’. Get one inch / 2.5 cm starter cubes.

Any commercially prepared standard 'hydroponic nutrient' should do nicely.

Plants will fail if their pH is too high or low. You need something to test the pH level of your nutrient solution and pH adjusters.

Try an herb such as basil, it will grow and flower quickly. Leaf lettuce is another good plant to use because we harvest before it flowers. Stay away from tomato, pepper, cucumber because they take a very long time to fruit.

Preparation

The first step is to pH balance the Rockwool starting cubes. pH refers to acid or alkaline level of the solution. The pH scale goes from one to fourteen, with seven being neutral. Any reading above seven is alkaline, any reading below seven is acidic. Tap water tends to be a little on the alkaline side and since plants prefer a slightly acidic root zone, we must add a little acid to the water we feed the plants.

Fill a one litre container with tap water. Pour about one tablespoon of the water into a small clear container. With an eye dropper add two drops of pH indicator solution to the water sample. Now compare the colour of the sample to the colour chart on the bottle. It will probably be greenish (pH 7-8). Next add two or three drops of ‘pH Down" (phosphoric acid) to the litre of water, stir and do the test again. Repeat this procedure until the sample turns yellow, indicating a pH of about 6.0. If the colour of the sample turns brownish or reddish, you have added too much pH Down, so just add more tap water to raise the pH level again. Be careful not to get any pH Down on your hands. If you do, wash immediately with water.

Set up the hydroponic system

Put the garden in the place where it will remain. It is not easy to move when it is in use. Make sure the garden is on a sturdy, level surface where it can’t be knocked over. When mounting on a window ledge make sure the ledge is wider than the garden.

Rockwool must not sit on a flat surface, there must be an air space underneath. Prop up, use ½" of Perlite or a standard 2 part nursery tray.

Attach the hose to the tray and bucket.

Plant seeds

Now you are ready to soak your one inch starter cubes in the pH balanced solution and put them on a plate or tray. It is now time to plant your seeds! Choose your seeds and insert one seed into the small hole in the top of each cube. If there is not a pre-made hole, make one about pencil width, a quarter inch / 0.75cm deep. Cover the hole with a bit of Rockwool so the seed has a dark place to sprout from. Take a small piece of saran wrap or plastic bag and cover the cubes to keep the moisture in. In a couple of days wet the cubes again with your pH balanced water.

Most seeds will begin to sprout in four to six days. Once they have sprouted, remove the saran wrap and moisten the cubes again.

Mix the nutrients

The nutrients are the plant’s source of food so it is important that we do not give them too much or too little. The hydroponic nutrients supply all of the mineral elements that plants otherwise would get from the soil. Since your plants are still very young, mix the nutrient solution at half strength this time.

So use 2.5 ml of each the ‘A’ and ‘B’ nutrient per litre (Check the instructions on your nutrients.). Mix enough solution to fill your tray to ¾ rd of the height of the Rockwool cubes.

pH balance the solution

This process is identical to the procedure for preparing the seeding cubes. Always adjust the pH level after mixing the nutrients as they will also lower the pH a little.

Flood and Drain your garden

Raise the bucket above the garden so the nutrient solution will flow into the tray.

The tray should be flooded to ¾ of the cubes’ height and drain immediately after. Make sure to not submerge the roots for more than 3 minutes.

Repeat this 2 to 3 times per day.

Maintenance of your nutrient solution

Plants use more water than nutrients, therefore top up the bucket with fresh water daily and pH balance the solution to 6.0 / 6.5.

Make a new solution each week. After the first week use ¾ strength nutrients, a week later you can start mixing a full strength solution.

This Flood and Drain technique exposes the roots directly to the nutrient solution. Erratic pH and EC (the amount of dissolved salts in the solution) is caused by the roots acting directly on the nutrient solution. Plants will benefit greatly by keeping these levels steady.

Light

Remember that light is very important. If your plants don’t have light, it doesn’t matter what you give them.

AEROPONIC


The aeroponic system is probably the most high-tech type of hydroponic gardening. Like the N.F.T. system above the growing medium is primarily air. The roots hang in the air and are misted with nutrient solution. The mistings are usually done every few minutes. Because the roots are exposed to the air like the N.F.T. system, the roots will dry out rapidly if the misting cycles are interrupted.

A timer controls the nutrient pump much like other types of hydroponic systems, except the aeroponic system needs a short cycle timer that runs the pump for a few seconds every couple of minutes.

N.F.T. (Nutrient Film Technique)


This is the kind of hydroponic system most people think of when they think about hydroponics. N.F.T. systems have a constant flow of nutrient solution so no timer required for the submersible pump. The nutrient solution is pumped into the growing tray (usually a tube) and flows over the roots of the plants, and then drains back into the reservoir.

There is usually no growing medium used other than air, which saves the expense of replacing the growing medium after every crop. Normally the plant is supported in a small plastic basket with the roots dangling into the nutrient solution.

N.F.T. systems are very susceptible to power outages and pump failures. The roots dry out very rapidly when the flow of nutrient solution is interrupted.

DRIP SYSTEMS (RECOVERY / NON-RECOVERY)


Drip systems are probably the most widely used type of hydroponic system in the world. Operation is simple, a timer controls a submersed pump. The timer turns the pump on and nutrient solution is dripped onto the base of each plant by a small drip line. In a Recovery Drip System the excess nutrient solution that runs off is collected back in the reservoir for re-use. The Non-Recovery System does not collect the run off.

A recovery system uses nutrient solution a bit more efficiently, as excess solution is reused, this also allows for the use of a more inexpensive timer because a recovery system doesn't require precise control of the watering cycles. The non-recovery system needs to have a more precise timer so that watering cycles can be adjusted to insure that the plants get enough nutrient solution and the runoff is kept to a minimum.

The non-recovery system requires less maintenance due to the fact that the excess nutrient solution isn't recycled back into the reservoir, so the nutrient strength and pH of the reservoir will not vary. This means that you can fill the reservoir with pH adjusted nutrient solution and then forget it until you need to mix more. A recovery system can have large shifts in the pH and nutrient strength levels that require periodic checking and adjusting.

EBB AND FLOW (FLOOD AND DRAIN)


The Ebb and Flow system works by temporarily flooding the grow tray with nutrient solution and then draining the solution back into the reservoir. This action is normally done with a submerged pump that is connected to a timer.

When the timer turns the pump on nutrient solution is pumped into the grow tray. When the timer shuts the pump off the nutrient solution flows back into the reservoir. The Timer is set to come on several times a day, depending on the size and type of plants, temperature and humidity and the type of growing medium used.

The Ebb and Flow is a versatile system that can be used with a variety of growing mediums. The entire grow tray can be filled with Grow Rocks, gravel or granular Rockwool. Many people like to use individual pots filled with growing medium, this makes it easier to move plants around or even move them in or out of the system. The main disadvantage of this type of system is that with some types of growing medium (Gravel, Growrocks, Perlite), there is a vulnerability to power outages as well as pump and timer failures. The roots can dry out quickly when the watering cycles are interrupted. This problem can be relieved somewhat by using growing media that retains more water (Rockwool, Vermiculite, coconut fiber or a good soiless mix like Pro-mix or Faffard's).

WATER CULTURE


The water culture system is the simplest of all active hydroponic systems. The platform that holds the plants is usually made of Styrofoam and floats directly on the nutrient solution. An air pump supplies air to the air stone that bubbles the nutrient solution and supplies oxygen to the roots of the plants.

Water culture is the system of choice for growing leaf lettuce, which are fast growing water loving plants, making them an ideal choice for this type of hydroponic system. Very few plants other than lettuce will do well in this type of system.

This type of hydroponic system is great for the classroom and is popular with teachers. A very inexpensive system can be made out of an old aquarium or other water tight container.

WICK SYSTEM


The Wick system is by far the simplest type of hydroponic system. This is a passive system, which means there are no moving parts. The nutrient solution is drawn into the growing medium from the reservoir with a wick. Free plans for a simple wick system are available (click here for plans).

This system can use a variety of growing medium. Perlite, Vermiculite, Pro-Mix and Coconut Fiber are among the most popular.

The biggest draw back of this system is that plants that are large or use large amounts of water may use up the nutrient solution faster than the wick(s) can supply it.

Nutrients And Additives

As with all hydroponic systems, it is only as good as the food that you use. Below are listed and illustrated the leaders in the nutrient market. It is our belief that some nutrient in some cases give better performance or pH stability than others. However personal preference and subjectivity rules the day. A lot of the time its like asking what’s better? Red or white wine? Bitter or larger? It depends apparently on what your eating with your drink! Well if you believe that then your believe anything. Hydroponics is the same if you find a nutrient you like and you believe it performs well then stick with it. If you are unhappy with your results then experiment with another make or a combination of makes and products, your got nothing to lose.

Nutrients are very important in hydroponics. They are the sole source of nutrition for your plants and you should always feed your plants with the best there is available. At Esoteric Hydroponics, we take our nutrients very seriously and can assure you that we only have on offer the best that there is available on the market today. Generally speaking, there are hydroponics nutrients (for young plants and vegetative growth) and bloom nutrients (flowering and fruiting). Formulations are available for all of our nutrients. Also, we offer hard water and soft water formulations for many of our nutrients to suit the various water types around the UK and to ensure your growing success.

NFT Hydroponics System


This was the original pioneering hydroponics technique. Although dated, it is still very popular among indoor horticulturists, mainly due to the inexpensive cost of setting up a NFT system but also its simplicity.

The principle is very easy to grasp. The plants are grow in a constant flow of nutrient enriched water. The water is spread out so as to flow in approximately 1-3mm of depth over a flat surface. This creates a film of water, which flows over the root system of the plant. This is not a rapid flow but enough of a flow that the water is in constant motion. Water is fed to the table via a submersible pump from the top end of the table.

As the water is pumped in at one end of the table, it slowly makes its way to the bottom of the table where it then returns back to the tank in which the pump is submerged. So you get constant exchange of the water in the tank being pumped from one end of the table then returning to the tank via the other end of the table. The film of nutrient should always be maintained at around 1 to 3mm of water. The roots of the plant should grow below and above the water’s surface that is why the film should be constant, allowing the water roots to develop below the water’s surface, and also allowing the air roots to grow above the water’s surface.

The draw back of this system is that as the roots are constantly submerged in a film of water, this prohibits the aeration to the root ball, which in turn prohibits outrageous performance. To get over this problem, some NFT growers put the pumps on cycles effectively flood and draining their NFT system, other growers put air stones in the water tank and even under their plants on the NFT tables. Most NFT growers administer H202 to their tanks but at a very dilute ratio, however this really needs to be done on a daily basis as dilute H2O2 breaks down very rapidly and over the course of 24 hours has completely dissolved its active ingredients. In using H2O2 in a daily capacity this prohibits the use of organic growth promoters and other products that reduce the possibility of bacterial break out like pythium.
The main draw back with NFT systems, especially in a grow room environment is the fact that pump failure is likely to strike at some point. The reason this tends to happen is that NFT systems are packaged with small flow rate pumps; cheap springs to mind but this is not technically fair. The plants only need a small delivery of water at a constant rate and the small pumps are all that can be used on a small NFT system. Now as the pump is perpetually on, the pump sees a lot of action over the course of its life. This coupled with the fact that you are then adding dissolved salts in the tank and in turn you are possibly in a hard water area, you get precipitation of the salts and the calcium that build up on get precipitation of the salts and the calcium that build up on and around the impeller of the pump. Once this impeller begins to attract precipitation it is not long until it either gives up spinning completely or that it does not deliver enough water to satisfy the plants’ needs, resulting in crop failure. Pump failure can be overcome through regular cleaning and maintenance of the pump or indeed regular replacements of the pumps, as mentioned earlier these are very inexpensive pumps and therefore can be regularly replaced without financial worry.

Another drawback with this technique is dude to the fact that the roots are constantly submerged in water the plants are very prone to bacterial disease like pythium. Again this can be overcome via regular dumping of the nutrient tank and adding products to the nutrient solution that have active ingredients that minimise the threat or root rot and moulds.

The last drawback is that heavy yielding plants tend to fall over in a NFT system. This is due to the fact that the roots grow out flat and long giving the plants no stability. As they grow older and bigger you will need to support the fruits or flowers otherwise they simply topple over. Supporting them is easy using yo-yos, string, canes or some growers use a scrog. This simple netting stretched out over the growing area. The plants then grow up through this netting which in turn helps support the plants.
All of the above to one side, these systems are very productive and are an excellent inexpensive teaching aid to the principle of hydroponics. Also with this beautiful innovation the world of hydroponics might not be with us as this technique was the first adopted and used by many growers all over the planet paving the way for our very own hydroponics revolution. One has to take one’s hat off to the British inventor that pioneered this technique. I mean, what made someone think: I know let’s grow plants in a soil-less medium using nothing but a film of nutrient to do it in. Off the wall you could say!

Hydroponic Systems


There are many hydroponic techniques on the market, NFT, Flood and Drain, Drip Irrigation, Aeroponics, Passive, and all these can be recirculating or run to waste.

Confused? You should be. Esoteric Hydroponics sells them all but for sanity's sake we have illustrated by far the most practical, easy to use, most popular systems on the market. These are, Nutrient Film Technique and Flood and Drain aka Ebb and Flow systems. The NFT system suits smaller budgets, gives good performance and is easy to use, however, it has a couple of drawbacks. These are lack of aeration to the root ball resulting in restricted results, lack of support for your heavy yielding plants resulting in you having to string or support your plants by whatever means you can think of. If pump failure strikes and you are away for the day with your lights on, it's kick the bucket time for your beloved plants. Apart from these drawbacks, which can be overcome, NFT cannot be mocked as its creation sparked the whole hydroponics revolution.
However, hydroponics has evolved a bit since NFT. For example, the Flood and Drain Pod system has taken the drawbacks of all the other hydroponics systems available on today's market and has overcome them in one fell swoop. Outrageous aeration to the rootball; superb support for your heavy yielders; at least three days grace if pump failure strikes, even if lights are constantly on; built-in overflow so no spills, modular - can be rebuilt to fit the most awkward spaces, hidden reservoir so no waste of valuable grow room space, a large capacity reservoir for reduced visits. As well as stupendous performance, it is becoming the definitive indoor hydro system and yes, even the largest 24 podder will fit through a loft hatch. All your concerns dealt with in one comprehensive technique - the Pod System™, invented, designed and manufactured by Esoteric Hydroponics.

What is Hydroponics?

Simply enough, hydroponics, sometimes referred to as hydro culture, is the process of growing plants without soil. It applies to flowers, trees, shrubs, vegetables and grains. Under that broad definition there are many variations of hydroponic practice in existence. As a general rule, more hydroponic growing is done indoor than outdoors, but this is because the main use of hydroponics to this stage has been commercial. There are few reasons why you should not use hydroponics outdoor if you wish and if you use the Autopot System, even those few reasons can be overcome or made much less of a problem.

Friday, September 21, 2007

Desktop Garden

Some of the easiest plants to grow include cacti and succulents. They don't need a lot of attention--they like low humidity, lots of light and a little bit of water. With a little creativity, you can design wonderfully low-maintenance desktop gardens.

To start with, you need a container. A shallow container, about two inches deep, works best. Terra cotta is always a nice option. For a planting medium, you can buy a cacti mixture, or you can mix your own: half sand, half potting soil.
Now you're ready for the plants. Design your garden in odd numbers to get a better pattern. And of course, for this project, remember to wear gloves so you won't get pricked. Arrange your plants and add rocks to help anchor the plants.

Let the cacti dry out in between waterings--you may have to water only every six weeks. Keep your container garden in a sunny location, like a sill or a desk, and simply enjoy.

Future Work

More work should be done to size and specify full-scale greenhouses, including retractable roof designs. Side vent placement to prevent plant damage and short-circuiting to the first roof vent is still being evaluated. Alternative shading techniques such as internal nets are also being studied for use in naturally ventilated greenhouses in both humid and arid desert climates. While span width studies have been limited by computer memory and speed, this problem is changing with each new computer.

How Natural Ventilation Works in Greenhouse

Natural ventilation in greenhouses functions primarily by wind blowing in one side and out the other. Wind can also create a vacuum pressure along the roof to “suck” the air out while letting air in the same vent or into the side vents. A secondary, much smaller effect is that of buoyancy, which predominates on hot, low wind days. In all cases, it is important to have at least one very effective inlet with multiple outlets; and that the air moves from inlet to outlet through the plants for good ventilation. For gutter-connected multi-spans, a combination of windward side vents and continuous leeward roof vents tends to result in the most effective ventilation design. For retractable roof designs, open windward side vents are as important as the open roof area to achieve mid-summer cooling.

History of Hydroponics

Experimenting with plant nutrients began over three hundred years ago. An English scientist, named John Woodward, experimented with plant nutrients. He wanted to know whether plants got their nutrients from the soil or the water. He began with plants in water and slowly added soil to the water each day. He discovered that the plants improved in size and health. He concluded that it was the soil, and the water which provided the nutrients for the plants.

However, his findings contradicted those of the farmers. Farmers believed that the soil only provided stability for the plants to root on to. This belief was based on their experiences with droughts. Without water, the crops died, no matter how rich in nutrients the soil was.

This was the beginning of many more experiments on plant nutrition. Discoveries and new wonderings which followed Woodward's investigations, led to what we now acknowledge as the science of hydroponics.

Today, many of the different methods of hydroponic gardening comes from the ideas of Dr. Gerike, a plant professor at the University of California at Davis. Dr. Gerike became famous with producing tomato plants 25 feet tall through his method of soilless gardening. In fact, Dr. Gerike was the person who named the science of soilless gardening, "hydroponics."

Hydroponics, growing and cultivating plants without soil, has been in existence since ancient civilization. The Egyptians, Inca Indian tribes, the Aztecs, and the Babylonians are examples of ancient civilizations which practiced hydroponic gardening without even realizing it,way before the word "hydroponics" was ever thought of. Although many of us think of hydroponics as a relatively new method in agriculture, our ancestors, in their efforts to always improve their technology in farming, have already been working and learning whatever their gardens could teach them, including soiless gardening. There, however, remains a lot be learned in the science of hydroponic gardening. Because of its low cost and easy workload, hydroponics captures the interest of many gardeners. New methods in hydroponic gardening are always being explored and will continue to be studied by other gardeners.

Seed Germination

Large seeds can be planted directly into aggregate culture systems or devices such as the Pipe Dream and thinned later. Plants with small seeds should be transplanted into the system to insure a good stand. With the water culture method, all plants must be transplanted to the system.

Seedlings to be transferred can be grown with their roots exposed or in root cubes. It is best to grow them with exposed roots if they are to be grown in a water culture or aeroponic system. Sow the seeds in quartz sand, coarse vermiculite, or perlite. Water them and cover them with wet paper towels or cheesecloth until they germinate. Then remove the covering and thin the plants. Moisten them as needed with a dilute nutrient solution rather than water because the germination medium does not provide adequate nutrition. A one-fourth concentration of the nutrient solution recommended in the next section may be used. When the seedlings are large enough to transplant, gently wash the growing medium from their roots. Do not be concerned if a few pieces of the medium remain on the roots.

Seedlings for the PVC pipe or NFT system should be grown in sterile root cubes, which are composed of expanded plastic foam, cellulose fiber, or a compressed mixture of peat and vermiculite. These cubes provide weight and help support the plant in the tube. Peat-lite mix or peat pots should not be used as they will disintegrate, and the particles may clog the pump that circulates the nutrient solution. Oasis Rootcubes and Horticubes are examples of commercially available root cubes.